Agentic Harness for Fast Moving Data Teams
SignalPilot is a Jupyter-native AI agentic harness that investigates data by connecting to your db warehouse, dbt lineage, query history, slack threads, notion, and Jira tickets — giving the AI institutional knowledge that coding assistants like ChatGPT and copilots can’t access.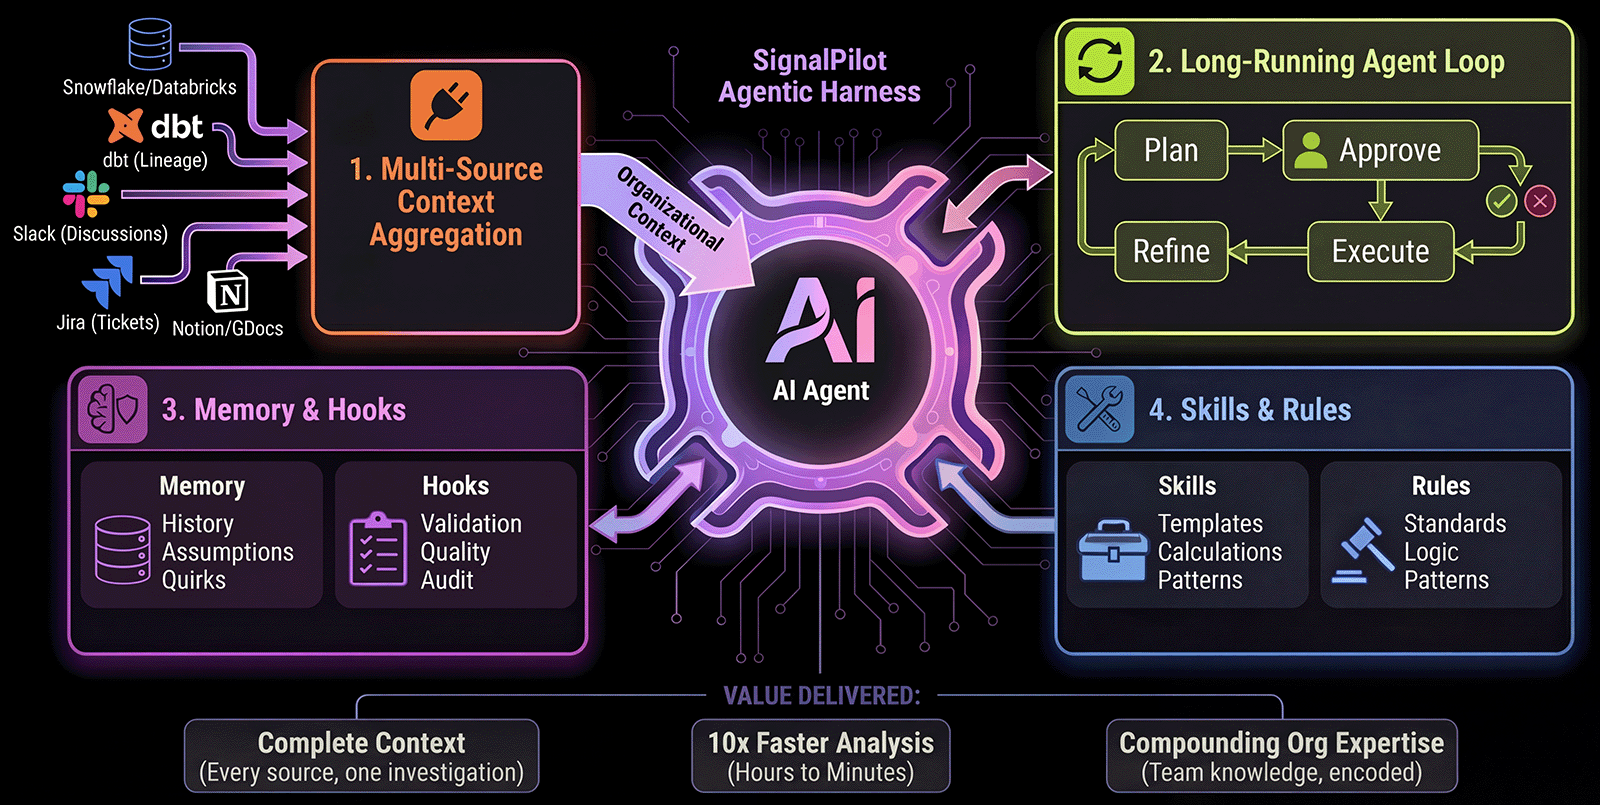
Multi-Source Context
Aggregates organizational knowledgeDb warehouse, db warehouse, dbt lineage, database schemas, Slack discussions, Jira tickets, past investigations
Long Running Agent Loop
Plans, Executes, IteratesNot single-shot completions — continuous loop until task complete with analyst-in-the-loop
Multi-Session Memory
Remembers institutional knowledgePast hypotheses, validated assumptions, known data quirks, MCP subagent
Skills and Rules
Teach SignalPilot your domainCustom skills (reusable analysis patterns), coding standards (imports, style), business logic (revenue formulas)
🔒 Zero data retention • Read-only access • Local-first execution • SOC 2 in progress
How is SignalPilot different from ChatGPT or Copilot?
ChatGPT and IDE copilots are general-purpose code generators. SignalPilot is purpose-built for data investigation:Full Org Context
ChatGPT/Copilots: Manual copy-paste or code files onlySignalPilot: Auto-connects to dbt, databases, Slack, Jira, query history via MCP
Multi-Step Investigations
ChatGPT/Copilots: Single-shot responses or single-file editsSignalPilot: Long-running loop with analyst-in-the-loop approval
Team Memory
ChatGPT/Copilots: No memory between sessions or notebooksSignalPilot: Remembers hypotheses, assumptions, data quirks
Custom Domain Logic
ChatGPT/Copilots: Generic suggestionsSignalPilot: Your team’s skills, rules, and business logic
See Full Comparison with Real Examples
SignalPilot vs ChatGPT vs Copilot — Head-to-head workflows + when to use each
One Minute Installer
Prerequisites: macOS, Linux, or Windows (WSL) • uv • Internet connection Don’t have uv? Install it first (takes seconds):Closed terminal or browser? Relaunch anytime
Closed terminal or browser? Relaunch anytime
Option 1: Using uvx (recommended)Option 2: Manual activation
Full Installation Guide
Alternative methods, manual installation (pip, conda, uv), troubleshooting
Get Started in 3 Steps
Launch SignalPilot
http://localhost:8888Not installed yet?
Not installed yet?
Run the installer first:Takes ~2 minutes to set up everything
Connect your data (optional)
Start immediately with local files:
- Type
@in chat to mention any CSV, Excel, or data file from thedata/folder - Home workspace:
~/SignalPilotHome/data/ - Project folder:
./data/in current working project directory
Database Setup
Connect PostgreSQL, Snowflake, BigQuery
Context & @Mentions
Reference local files, dataframes, and databases
Ask your first question
“Show me the top 10 customers by revenue this month”SignalPilot generates a plan → you approve → it executes
5-Minute Quickstart
Complete walkthrough with real example
Learn More
How It Works
4 foundational systems explainedMCP context layer, long-running loop, memory & hooks, skills & rules
Why SignalPilot?
vs ChatGPT vs IDE CopilotsFull comparison + real-world investigation example
Security & Privacy
Read-only, local-first, zero retentionSOC 2 in progress, GDPR compliant, audit trail
All Integrations
Connect your data stackPostgreSQL, Snowflake, dbt, Slack, Jira, and more
Resources
Quickstart Tutorial
5-minute investigation walkthrough
CLI Reference
Commands and troubleshooting
Configuration
Customize behavior and rules
Discord Community
Get help and share use cases
GitHub
Report issues and contribute
Documentation
Full concepts and guides